วันศุกร์ที่ 19 มิถุนายน พ.ศ. 2552

Retaining historical index usage statistics for SQL Server
Written By: Tim Ford -- 5/12/2009

Problem
Starting with Microsoft SQL Server 2005, DBAs were able to have a greater insight into the inner workings of their supported SQL Server instances through the use of Dynamic Management Views and Functions, collectively known as DMOs (Dynamic Management Objects.)

Some of the most-beneficial information concerns index usage. This metadata is collected by the Query Optimizer Engine and cached for querying via the sys.dm_db_index_usage_stats DMV as well as the collection of Missing Index DMOs (sys.dm_db_missing_index_groups, sys.dm_db_missing_index_group_stats, sys.dm_db_missing_index_columns, and sys.dm_db_missing_index_details.) There is a very critical shortcoming in the underlying process however; the information, since it is cached and not persisted in a physical table, is permanently lost once a SQL Server service restart occurs. In this three-part series I'll look at what you can do to persist this data so you don't find yourself waiting for usage stats to compile over a reasonable period of time just so you can harness the power of the indexing DMOs in your performance tuning process.

When determining how to persist the data I originally thought the process would be extremely straight-forward. On the surface one would think that you would simply a build code construct that would drop the persisted table if it exists, then do a SELECT...INTO from the DMV into a new physical table. Well, that would be great if you didn't care about losing all your persisted data after a service restart, but that would be exactly what would happen if this script was run after a service restart. Therefore the code is slightly more complex than that. This being Part One, we will focus on setting up the structure of that code, the necessary underlying objects, and the suggested process to make it all work for you in regards to the sys.dm_db_index_usage_stats that record information on which indexes are (and just as importantly are not being utilized.) Part Two will focus on a similar process for the sys.dm_index_operational_stats DMF. Part Three will wrap up this series with persisting a collected view from the four Missing Index DMOs.

Solution
As I've stated before in many of the tips I've written here at MSSQLTips.com, I have a dedicated database on each of my SQL Server instances specifically for administrative objects I use in my daily tasks and automated administrative processes. It is here that I have created the necessary objects for the metadata persisting processes I'm outlining in this series. I'm providing the code below to create the database and all necessary objects we will be discussing, if you have your own dedicated administrative database please feel free to alter the code accordingly. As always, any code you see presented here should be thoroughly tested in a non-production environment before applying to a live production instance of SQL Server.

Step One: Create the Administrative Database and All Necessary Objects

I separate my database objects within my administrative database by schema. You'll see below that after creation of the database, I create a MetaBot schema that will serve as the schema for all objects of this process type.

USE [master]
GO
CREATE DATABASE [iDBA] ON PRIMARY
(
NAME = N'iDBA',
FILENAME = N'C:\Program Files\Microsoft SQL Server\MSSQL.1\MSSQL\DATA\iDBA.mdf' ,
SIZE = 10MB ,
FILEGROWTH = 5MB
)
LOG ON
(
NAME = N'iDBA_log',
FILENAME = N'C:\Program Files\Microsoft SQL Server\MSSQL.1\MSSQL\DATA\iDBA_log.ldf' ,
SIZE = 5120KB ,
FILEGROWTH = 5120KB
)
GO

USE [iDBA]
GO
CREATE SCHEMA [MetaBot] AUTHORIZATION [dbo]
GO

From here we only require two user-created database objects: the repository table that will persist the data (MetaBot.dm_db_index_usage_stats) and the stored procedure used to collect it. Let's first look at the structure of the table and I'll make my case as to why it's slightly more-complex than you would expect and why it's not normalized.

CREATE TABLE [MetaBOT].[dm_db_index_usage_stats](
[database_id] [smallint] NOT NULL,
[object_id] [int] NOT NULL,
[index_id] [int] NOT NULL,
[user_seeks] [bigint] NOT NULL,
[user_scans] [bigint] NOT NULL,
[user_lookups] [bigint] NOT NULL,
[user_updates] [bigint] NOT NULL,
[last_user_seek] [datetime] NULL,
[last_user_scan] [datetime] NULL,
[last_user_lookup] [datetime] NULL,
[last_user_update] [datetime] NULL,
[system_seeks] [bigint] NOT NULL,
[system_scans] [bigint] NOT NULL,
[system_lookups] [bigint] NOT NULL,
[system_updates] [bigint] NOT NULL,
[last_system_seek] [datetime] NULL,
[last_system_scan] [datetime] NULL,
[last_system_lookup] [datetime] NULL,
[last_system_update] [datetime] NULL,
[last_poll_user_seeks] [bigint] NOT NULL,
[last_poll_user_scans] [bigint] NOT NULL,
[last_poll_user_lookups] [bigint] NOT NULL,
[last_poll_user_updates] [bigint] NOT NULL,
[last_poll_system_seeks] [bigint] NOT NULL,
[last_poll_system_scans] [bigint] NOT NULL,
[last_poll_system_lookups] [bigint] NOT NULL,
[last_poll_system_updates] [bigint] NOT NULL,
[date_stamp] [datetime] NOT NULL,
CONSTRAINT [PK_dm_db_index_usage_stats] PRIMARY KEY CLUSTERED
( [database_id] ASC,
[object_id] ASC,
[index_id] ASC
)WITH (FILLFACTOR = 90) ON [PRIMARY]
) ON [PRIMARY]

CREATE NONCLUSTERED INDEX [IX_user_reads] ON [MetaBOT].[dm_db_index_usage_stats]
([user_scans], [user_seeks], [user_lookups])
WITH (FILLFACTOR = 80) ON [PRIMARY]

CREATE NONCLUSTERED INDEX [IX_user_writes] ON [MetaBOT].[dm_db_index_usage_stats]
([user_updates])
WITH (FILLFACTOR = 80) ON [PRIMARY]

The table is (for the most part) a duplicate in structure of the sys.dm_db_index_usage_stats Dynamic Management View with a few notable exceptions:

  • collection of columns prefixed with "last_poll_"
  • date_stamp column

The last_poll_... columns are vital for the calculations that go into the incrementing and updating of usage counts each time the stored procedure will run against sys.dm_db_index_usage_stats. If your instance never is subject to a service restart these columns would not be necessary, however we all know that is not the case. Even the best-constructed environments must still have routine maintenance that will require bringing the system down. The date_stamp column will record when the last refresh of MetaBot.dm_db_index_usage_stats occurred. It also serves to determine how the usage values are incremented in that it is compared to the last time the services were cycled. Depending on whether that occurred pre or post the last refresh occurred, a different calculation is used to update the related columns. We will go over those possible calculations after we look at the stored procedure code. The table I'll present should make this much clearer to you.

Speaking of the stored procedure code, I'm presenting it below.

USE iDBA
GO

CREATE PROCEDURE MetaBot.usp_persist_dm_db_index_usage_stats AS
DECLARE
@last_service_start_date datetime
DECLARE @last_data_persist_date datetime

--Determine last service restart date based upon tempdb creation date
SELECT @last_service_start_date =
SD.[create_date]
FROM sys.databases SD
WHERE SD.[name] = 'tempdb'

--Return the value for the last refresh date of the persisting table
SELECT @last_data_persist_date =
MAX
(MDDIUS.[date_stamp])
FROM [iDBA].[MetaBOT].[dm_db_index_usage_stats] MDDIUS

--Take care of updated records first
IF @last_service_start_date < @last_data_persist_date
BEGIN
--Service restart date > last poll date
PRINT 'The latest persist date was ' +
CAST(@last_data_persist_date AS VARCHAR(50)) +
'; no restarts occurred since ' +
CAST(@last_service_start_date AS VARCHAR(50)) +
' (' + CAST(DATEDIFF(d, @last_service_start_date, @last_data_persist_date) AS VARCHAR(10)) +
' days ago.)'

UPDATE MDDIUS
SET
MDDIUS.[user_seeks] = MDDIUS.[user_seeks]+(SDDIUS.[user_seeks] - MDDIUS.[last_poll_user_seeks]),
MDDIUS.[user_scans] = MDDIUS.[user_scans]+(SDDIUS.[user_scans] - MDDIUS.[last_poll_user_scans]),
MDDIUS.[user_lookups] = MDDIUS.[user_lookups]+(SDDIUS.[user_lookups] - MDDIUS.[last_poll_user_lookups]),
MDDIUS.[user_updates] = MDDIUS.[user_updates]+(SDDIUS.[user_updates] - MDDIUS.[last_poll_user_updates]),
MDDIUS.[last_user_seek] = SDDIUS.[last_user_seek],
MDDIUS.[last_user_scan] = SDDIUS.[last_user_scan],
MDDIUS.[last_user_lookup] = SDDIUS.[last_user_lookup],
MDDIUS.[last_user_update] = SDDIUS.[last_user_update],
MDDIUS.[system_seeks] = MDDIUS.[system_seeks]+(SDDIUS.[system_seeks] - MDDIUS.[last_poll_system_seeks]),
MDDIUS.[system_scans] = MDDIUS.[system_scans]+(SDDIUS.[system_scans] - MDDIUS.[last_poll_system_scans]),
MDDIUS.[system_lookups] = MDDIUS.[system_lookups]+(SDDIUS.[system_lookups] - MDDIUS.[last_poll_system_lookups]),
MDDIUS.[system_updates] = MDDIUS.[system_updates]+(SDDIUS.[system_updates] - MDDIUS.[last_poll_system_updates]),
MDDIUS.[last_system_seek] = SDDIUS.[last_system_seek],
MDDIUS.[last_system_scan] = SDDIUS.[last_system_scan],
MDDIUS.[last_system_lookup] = SDDIUS.[last_system_lookup],
MDDIUS.[last_system_update] = SDDIUS.[last_system_update],
MDDIUS.[last_poll_user_seeks] = SDDIUS.[user_seeks],
MDDIUS.[last_poll_user_scans] = SDDIUS.[user_scans],
MDDIUS.[last_poll_user_lookups] = SDDIUS.[user_lookups],
MDDIUS.[last_poll_user_updates] = SDDIUS.[user_updates],
MDDIUS.[last_poll_system_seeks] = SDDIUS.[system_seeks],
MDDIUS.[last_poll_system_scans] = SDDIUS.[system_scans],
MDDIUS.[last_poll_system_lookups] = SDDIUS.[system_lookups],
MDDIUS.[last_poll_system_updates] = SDDIUS.[system_updates],
MDDIUS.date_stamp = GETDATE()
FROM [sys].[dm_db_index_usage_stats] SDDIUS INNER JOIN
[iDBA].[MetaBot].[dm_db_index_usage_stats] MDDIUS
ON SDDIUS.[database_id] = MDDIUS.[database_id]
AND SDDIUS.[object_id] = MDDIUS.[object_id]
AND SDDIUS.[index_id] = MDDIUS.[index_id]
END
ELSE
BEGIN
--Service restart date < last poll date
PRINT 'Lastest service restart occurred on ' +
CAST(@last_service_start_date AS VARCHAR(50)) +
' which is after the latest persist date of ' +
CAST(@last_data_persist_date AS VARCHAR(50))

UPDATE MDDIUS
SET
MDDIUS.[user_seeks] = MDDIUS.[user_seeks]+ SDDIUS.[user_seeks],
MDDIUS.[user_scans] = MDDIUS.[user_scans]+ SDDIUS.[user_scans],
MDDIUS.[user_lookups] = MDDIUS.[user_lookups]+ SDDIUS.[user_lookups],
MDDIUS.[user_updates] = MDDIUS.[user_updates]+ SDDIUS.[user_updates],
MDDIUS.[last_user_seek] = SDDIUS.[last_user_seek],
MDDIUS.[last_user_scan] = SDDIUS.[last_user_scan],
MDDIUS.[last_user_lookup] = SDDIUS.[last_user_lookup],
MDDIUS.[last_user_update] = SDDIUS.[last_user_update],
MDDIUS.[system_seeks] = MDDIUS.[system_seeks]+ SDDIUS.[system_seeks],
MDDIUS.[system_scans] = MDDIUS.[system_scans]+ SDDIUS.[system_scans],
MDDIUS.[system_lookups] = MDDIUS.[system_lookups]+ SDDIUS.[system_lookups],
MDDIUS.[system_updates] = MDDIUS.[system_updates]+ SDDIUS.[system_updates],
MDDIUS.[last_system_seek] = SDDIUS.[last_system_seek],
MDDIUS.[last_system_scan] = SDDIUS.[last_system_scan],
MDDIUS.[last_system_lookup] = SDDIUS.[last_system_lookup],
MDDIUS.[last_system_update] = SDDIUS.[last_system_update],
MDDIUS.[last_poll_user_seeks] = SDDIUS.[user_seeks],
MDDIUS.[last_poll_user_scans] = SDDIUS.[user_scans],
MDDIUS.[last_poll_user_lookups] = SDDIUS.[user_lookups],
MDDIUS.[last_poll_user_updates] = SDDIUS.[user_updates],
MDDIUS.[last_poll_system_seeks] = SDDIUS.[system_seeks],
MDDIUS.[last_poll_system_scans] = SDDIUS.[system_scans],
MDDIUS.[last_poll_system_lookups] = SDDIUS.[system_lookups],
MDDIUS.[last_poll_system_updates] = SDDIUS.[system_updates],
MDDIUS.date_stamp = GETDATE()
FROM [sys].[dm_db_index_usage_stats] SDDIUS INNER JOIN
[iDBA].[MetaBot].[dm_db_index_usage_stats] MDDIUS
ON SDDIUS.[database_id] = MDDIUS.[database_id]
AND SDDIUS.[object_id] = MDDIUS.[object_id]
AND SDDIUS.[index_id] = MDDIUS.[index_id]
END

--Take care of new records next
INSERT INTO [iDBA].[MetaBot].[dm_db_index_usage_stats]
(
[database_id], [object_id], [index_id],
[user_seeks], [user_scans], [user_lookups],
[user_updates], [last_user_seek], [last_user_scan],
[last_user_lookup], [last_user_update], [system_seeks],
[system_scans], [system_lookups], [system_updates],
[last_system_seek], [last_system_scan],
[last_system_lookup], [last_system_update],
[last_poll_user_seeks], [last_poll_user_scans],
[last_poll_user_lookups], [last_poll_user_updates],
[last_poll_system_seeks], [last_poll_system_scans],
[last_poll_system_lookups], [last_poll_system_updates],
[date_stamp]
)
SELECT SDDIUS.[database_id], SDDIUS.[object_id], SDDIUS.[index_id],
SDDIUS.[user_seeks], SDDIUS.[user_scans], SDDIUS.[user_lookups],
SDDIUS.[user_updates], SDDIUS.[last_user_seek], SDDIUS.[last_user_scan],
SDDIUS.[last_user_lookup], SDDIUS.[last_user_update], SDDIUS.[system_seeks],
SDDIUS.[system_scans], SDDIUS.[system_lookups], SDDIUS.[system_updates],
SDDIUS.[last_system_seek], SDDIUS.[last_system_scan],
SDDIUS.[last_system_lookup], SDDIUS.[last_system_update],
SDDIUS.[user_seeks], SDDIUS.[user_scans], SDDIUS.[user_lookups],
SDDIUS.[user_updates],SDDIUS.[system_seeks],
SDDIUS.[system_scans], SDDIUS.[system_lookups],
SDDIUS.[system_updates], GETDATE()
FROM [sys].[dm_db_index_usage_stats] SDDIUS LEFT JOIN
[iDBA].[MetaBot].[dm_db_index_usage_stats] MDDIUS
ON SDDIUS.[database_id] = MDDIUS.[database_id]
AND SDDIUS.[object_id] = MDDIUS.[object_id]
AND SDDIUS.[index_id] = MDDIUS.[index_id]
WHERE MDDIUS.[database_id] IS NULL
AND
MDDIUS.[object_id] IS NULL
AND
MDDIUS.[index_id] IS NULL

The code is comprised of a few different logical sections:

  • Variable declarations and value assignments
  • Update of existing values with new usage counts
  • Insertion of new rows associated with indexes that have, up to this point, not been used in any read or write processes.

The two variables in the stored procedure determine which UPDATE script runs in the confines of the stored procedure. This is necessary, because the correct calculation for incrementing the index usage columns depends upon either the last_poll column pertaining to the specific user or system index action (seek, scan, update, or lookup) or the last persisted value for the corresponding usage column. The following table illustrates this issue much better than I can do in this limited space. M is the alias for MetaBot.dm_db_index_usage_stats, S is the alias for the sys.dm_db_index_usage_stats DMV.

M.user_scans(existing) M.last_poll (existing) S.user_scans M.user_scans (new) Calculation M.last_poll (new) Calculation
Initial Population (INSERT) 0 0 10 10 = S.col 10 = S.col
restart_date <> 10 10 15 15 = M.col + (S.col - M.last_poll _col) 15 = S.col
SQL Server service restart occurs, all cached values lost, increments reset to 0
restart_date > last_date_stamp value 15 15 5 20 = M.col + S.col 5 = S.col
restart_date <> 15 5 8 18 = M.col + (S.col - M.last_poll _col) 8 = S.col

When a unique record is first encountered it is inserted into the persisted table. A unique record is based upon the combination key of database_id, object_id, and index_id in the case of the sys.dm_db_index_usage_stats DMV. If this combination of identifiers already exists in the persisted table, the stored procedure relies upon the underlying determination of whether or not a system restart has been encountered since the last time the metadata was persisted. If it has not, then the usage columns are incremented by adding the existing value of that field to the difference between the new value from the DMV and the last value that was read from the DMV when the last run of the stored procedure executed. If a restart did occur, then the counters are all reset to 0. This means that the formula previously outlined would result in incorrect numbers being persisted. Instead you must take the sum of the existing column value and the corresponding value from the DMV as the new value to be persisted. In all cases the calculation for the last_poll column value will remain unchanged as will the code associated with the INSERT of new index usage rows.

You may notice that we do risk the loss of counter data. The only way to ensure that all usage data is persisted would be if this stored procedure would run prior to any service restart - not a viable option. However, unlike user data, we are using this metadata for metrics in determining whether an index is of any value - is it used significantly to offset the overhead of writes against it. So long as we record significant data over the lifetime of the instance we have no need to capture all usage values within reason.

The final step would be to create a SQL Server Agent Job for the execution of this stored procedure. I'll leave that up to you. In our environment I run this process six times daily. It's very lightweight and I've not found it to interfere with normal user operations or backup cycles. I do not run it during the timeframe of scheduled index maintenance, but that is by choice on my part. I encourage you to test with schedules that fit your individual needs.

In the next tip of the series we will create a similar process for the sys.dm_db_index_operational_stats DMF, which needs to be handled in a slightly different manner as it is a function with the narrower scope of a database versus the instance scope of sys.dm_db_index_usage_stats.

Thank you: MS SQL TRIPS

Using authenticators with SQL Server encryption
Written By: K. Brian Kelley -- 5/27/2009

Problem
I want to use SQL Server-based encryption, but I want some additional "protection" so that even if someone has access to the keys, they can't arbitrarily decrypt the data. I've read about authenticators but am not sure how to use them. How do they work?

Solution
Authenticators are additional data that gets encrypted along with the data to be stored in an encrypted manner. When it comes to decrypt the data, if the right authenticator isn't specified, SQL Server doesn't return the data in the decrypted form. Rather, a NULL value is returned, just as if the wrong key was used. For instance, consider the case with storing credit card numbers. We can use the 3 digit security code as the authenticator. If the proper security code isn't passed in when the credit card is retrieved, the credit card number can't be retrieved.

The first thing we need to do is make sure we have a master key, certificate and symmetric key for this process. The code below will create these in the database you are testing this in:

-- Create database master key which will be used to encrypt the certificate private key
CREATE MASTER KEY ENCRYPTION BY PASSWORD = 'SomeStr0ngPassw0rd!';
GO

-- Create the certificate which will be used to encrypt the symmetric key
CREATE CERTIFICATE EncryptKeyForCreditCard
WITH SUBJECT = 'Certificate Used to Encrypt Symmetric Key for credit card number handling';
GO

-- Create the symmetric key
CREATE SYMMETRIC KEY CreditCardEncryptionKey
WITH ALGORITHM = AES_256
ENCRYPTION
BY CERTIFICATE EncryptKeyForCreditCard;
GO

The script below creates a table and a stored procedure to help illustrate this.

/* Create the table to store credit card information
Normally we'd have a foreign key for CustomerID referring to the
Customer table. However, we won't create such for this example. */
CREATE TABLE dbo.CreditCard (
CreditCardID INT IDENTITY(1,1) NOT NULL PRIMARY KEY CLUSTERED,
CustomerID INT NOT NULL,
CardFriendlyName VARCHAR(50) NOT NULL,
NameOnCard VARCHAR(100) NOT NULL,
ExpirationDate SMALLDATETIME NOT NULL,
CardNumber VARBINARY(128) NOT NULL
);
GO

CREATE PROC dbo.InsertCard
@CustomerID INT,
@CardFriendlyName VARCHAR(50),
@NameOnCard VARCHAR(100),
@ExpirationDate SMALLDATETIME,
@CardNumber CHAR(16),
@SecurityCode CHAR(3)
AS
BEGIN
OPEN
SYMMETRIC KEY CreditCardEncryptionKey DECRYPTION BY CERTIFICATE EncryptKeyForCreditCard;

INSERT INTO dbo.CreditCard
(CustomerID, CardFriendlyName, NameOnCard, ExpirationDate, CardNumber)
VALUES
(@CustomerID, @CardFriendlyName, @NameOnCard, @ExpirationDate,
EncryptByKey(Key_GUID('CreditCardEncryptionKey'), @CardNumber, 1, @SecurityCode) );

CLOSE SYMMETRIC KEY CreditCardEncryptionKey;
END;
GO

CREATE PROC dbo.RetrieveCard
@CustomerID INT,
@CardFriendlyName VARCHAR(50),
@SecurityCode CHAR(3)
AS
BEGIN
SELECT
NameOnCard, ExpirationDate,
CONVERT(CHAR(16), DecryptByKeyAutoCert(cert_ID('EncryptKeyForCreditCard'), NULL, CardNumber, 1, @SecurityCode)) AS CardNumber
FROM dbo.CreditCard
WHERE CustomerID = @CustomerID
AND CardFriendlyName = @CardFriendlyName;
END;
GO

When the credit card number is stored in the CreditCard table, it will be stored in an encrypted format. When we go to store it, if we use @SecurityCode as the authenticator, it will need to be used as an authenticator to get the credit card number back in a plaintext (unencrypted) format. So when we specify the EncryptByKey() function, we'll be sure to use the parameter that tells that function we're going to use an authenticator and then pass the @SecurityCode parameter as the authenticator. When it comes time to retrieve the card, we'll use the DecryptByKeyAutoCert() function because we just need to specify the certificate and it'll automatically decrypt the symmetric key and then access the data. Again, we'll specify the parameter to indicate an authenticator is being used and we'll pass the @SecurityCode parameter as the authenticator. If it's correct, the credit card number will be returned, otherwise SQL Server will return a NULL.

Let's look at an example.

EXEC dbo.InsertCard 1, 'MyCard', 'John Doe', '20120601', '1111222233334444', '888';

The authenticator being used is '888' and if anything else is specified, the credit card number won't be returned. For instance:

EXEC dbo.RetrieveCard 1, 'MyCard', '777';

Returns the following:

Wrong Authenticator - No Data

But if we specify the right value for @SecurityCode:

EXEC dbo.RetrieveCard 1, 'MyCard', '888';

We get the credit card number back:

Correct Authenticator - Data Returned

And in this case we see that the correct authenticator makes all the difference. Therefore, if an attacker were able to get the database, even if he or she were able to access the keys, without the authenticators, the data will not be successfully retrieved.

Thank you: MS SQL TRIPS

SQL Server 2005 transaction log backup maintenance plan via SSIS
Written By: Michelle Gutzait -- 5/19/2009

Problem
In SQL Server 2005, when you configure a transaction log backup maintenance task for "all user databases", the transaction log backup task is not automatically checking the Recovery Model of the databases configured to be backed up. The result is that if the recovery model of the database is Simple, the task will simply fail. In SQL Server 2008 this issue has been resolved and only the databases with FULL recovery model will have their transaction logs backed up. One common solution to this "issue" in SQL Server 2005 is coding the transaction log backup task. To me, this is like inventing the wheel (I am the lazy DBA of the gang), so I would like to provide a much simpler solution here, which will also allow reverting back to the defaults after upgrading the instance to SQL Server 2008.

Solution
So I already have a maintenance task configured to backup T-Logs of all my "user databases" and it occasionally fails when a database is in a simple recovery model. Right now, I simply check the job's log occasionally and ignore failures. Let me show you a simple way to add a step to your existing maintenance plans to resolve this issue until you upgrade to SQL Server 2008.

My maintenance task looks like this:

General configurations:

  • Backup task:
    • Backup type: Transaction Log
    • Databases: All user databases
    • Destination: disk
  • Cleanup of database backup files
    • Older than one day
  • Scheduled to run every 1 hour

Unfortunately, the first step fails if a database is added with a SIMPLE recovery model or if an existing database is converted from FULL recovery model to SIMPLE.


My new maintenance plan looks like this:

I modified the precedence constraint between the tasks to be executed on COMPLETION instead of on SUCCESS. With this simple change, I make sure that the maintenance cleanup task always executes.


The Checkup Step

Next I added a step in my SSIS Package that I am calling the "The Checkup Step". This new step will validate all of the transaction log backups that should have been completed were actually successful. Here is the the sample code:

declare @i int;
with x as
(
select max(isnull(datediff(mi,b.backup_start_date,getdate()),100)) as NumHrsLastBackup,
d.name as DatabaseName
from master..sysdatabases d with (nolock)
left join msdb..backupset b with (nolock)
on d.name = b.database_name
AND b.type = 'L'
-- We are checking only the last backup:
and b.backup_start_date = (select max(backup_start_date)
from msdb..backupset b2
where b.database_name = b2.database_name
and b2.type = b.type)
-- Check only user DBs with SIMPLE recovery model, ONLINE and not READ ONLY:
where d.name NOT IN ('tempdb','msdb','master','model')
and DatabasePropertyEx(d.name,'Recovery') = 'FULL'
and DatabasePropertyEx(d.name,'Status') = 'ONLINE'
and DatabasePropertyEx(d.name,'Updateability') = 'READ_WRITE'
group by d.name, b.type, b.backup_size)
-- How many databases were not backed up in the last hour
-- (change the '>59' to the right schedule for your job, in minutes)
select @i = count(*)
from x
where NumHrsLastBackup > 59;
-- Fail the step if backups that should exist, do not exist
IF @i > 0 raiserror ('Error: T-Logbackup failed for some databases',16,1);

I tried to add "The checkup step" to the Maintenance Plan itself as follows:

Executing it on failure of the Backup Task. Unfortunately, in order to avoid package failure when the Database backup task fails, I tried to set up the Properties of the Backup Database task to the following:

  • FailPackageOnFailure --> False
  • FailParentOnFailure --> False
  • MaximumErrorCount --> 0

Unfortunately, these configurations did not work and the package kept failing. So I had to find another option.


Add "The checkup step" to the job

Based on the failures, I decided to add "The checkup step" to the SQL Server Agent Job that was created by SSIS when the schedule was established. The original Job Steps look like the following:

The first step to modify the SQL Server Agent Job is to click the "Edit" button on the bottom of the interface. Then click the Advanced options on the left. Finally, change the "On failure action" to "Go to next step" and retain the "On success action" of "Quit the job reporting success" as shown below. Click the "OK" button to save the settings.

Now let's click the "Insert" button to add a New step after the existing one. On the General page configure the following:

  • Step name: Check missing TLog Backups
  • Type: Transact-SQL script (T-SQL)
  • Database: Master
  • Command: Script from above

On the Advanced page retain the On success action and On failure action defaults.

Although it is not a best practice to modify SQL Server Agent Jobs that are created by SSIS, I found this as a reasonable means to correct my issue in SQL Server 2005. Now, the job will only fail if the backup of one of the databases in FULL recovery model fails.

Here is an example of the execution from the job history where the job itself succeeded although the step failed.


Summary

This tip provides a simple solution for the problematic T-Log backup task in SQL 2005 in SSIS. After you upgrade your instance to SQL Server 2008, you can just remove the additional step from the job and you are good to go. On a second thought, if you leave "The checkup step" in the job it will simply provide you with another check that the backups were successful.

Thank you: MS SQL TRIPS
How to find out how long a SQL Server backup took
Written By: Thomas LaRock -- 5/8/2009

Problem
Many shops do full backups of their databases as part of a job within SQL Agent, typically as part of a maintenance plan. This job will often times do all database backups in secession. As such, while you may know how long the job takes, you may not know how long any one particular database takes to have a full backup taken. When deploying changes it is advised to take a full backup of a database prior to deploying the change and a common question faced will be "how long will it take?".

Solution
The information is readily available inside the msdb database, making the solution as easy as a few lines of T-SQL.

The T-SQL provided below allows for you to input the name of a database if desired. I have also added a line that will filter the results, limiting your view to only the databases that are currently listed in the master.dbo.sysdatabases table. If you comment out that line of code you will return information on the last time a database was backed up on the instance, regardless if the database is currently listed in master.dbo.sysdatabases.


Returning the details

Here is the T-SQL

DECLARE @dbname sysname
SET @dbname = NULL --set this to be whatever dbname you want
SELECT bup.user_name AS [User],
bup.database_name AS [Database],
bup.server_name AS [Server],
bup.backup_start_date AS [Backup Started],
bup.backup_finish_date AS [Backup Finished]
,CAST((CAST(DATEDIFF(s, bup.backup_start_date, bup.backup_finish_date) AS int))/3600 AS varchar) + ' hours, '
+ CAST((CAST(DATEDIFF(s, bup.backup_start_date, bup.backup_finish_date) AS int))/60 AS varchar)+ ' minutes, '
+ CAST((CAST(DATEDIFF(s, bup.backup_start_date, bup.backup_finish_date) AS int))%60 AS varchar)+ ' seconds'
AS [Total Time]
FROM msdb.dbo.backupset bup
WHERE bup.backup_set_id IN
(SELECT MAX(backup_set_id) FROM msdb.dbo.backupset
WHERE database_name = ISNULL(@dbname, database_name) --if no dbname, then return all
AND type = 'D' --only interested in the time of last full backup
GROUP BY database_name)
/* COMMENT THE NEXT LINE IF YOU WANT ALL BACKUP HISTORY */
AND bup.database_name IN (SELECT name FROM master.dbo.sysdatabases)
ORDER BY bup.database_name

The script will return the following result set:

Column Name

Description

User The name of the user that issued the BACKUP DATABASE command.
Database The name of the database.
Server The name of the server instance.
Backup Started The time at which the backup was started.
Backup Finished The time at which the backup was completed.
Total Time The total amount of time it took to complete the backup for that database.

Images

Here is a screenshot of a sample result set returned by the script.


If you want to get a list of all backups and not just the most recent you can issue the following:

DECLARE @dbname sysname
SET @dbname = NULL --set this to be whatever dbname you want
SELECT bup.user_name AS [User],
bup.database_name AS [Database],
bup.server_name AS [Server],
bup.backup_start_date AS [Backup Started],
bup.backup_finish_date AS [Backup Finished]
,CAST((CAST(DATEDIFF(s, bup.backup_start_date, bup.backup_finish_date) AS int))/3600 AS varchar) + ' hours, '
+ CAST((CAST(DATEDIFF(s, bup.backup_start_date, bup.backup_finish_date) AS int))/60 AS varchar)+ ' minutes, '
+ CAST((CAST(DATEDIFF(s, bup.backup_start_date, bup.backup_finish_date) AS int))%60 AS varchar)+ ' seconds'
AS [Total Time]
FROM msdb.dbo.backupset bup
/* COMMENT THE NEXT LINE IF YOU WANT ALL BACKUP HISTORY */
WHERE bup.database_name IN (SELECT name FROM master.dbo.sysdatabases)
ORDER BY bup.database_name

Thank you: MS SQL TRIPS

Execute same SQL Server query across multiple servers at the same time using Central Management Servers
Written By: Kun Lee -- 6/8/2009

Problem
Managing multiple SQL Servers has its challenges. One of the big challenges is having to collect data from each of the servers you manage and figure out which servers need attention. You can setup a process to connect to each server and collect the data or you can use a third party tool, but SQL 2008 offers a new way of doing this using Central Management Servers. In this tip I show you what this new feature is, how to setup it and how to collect data from all of your servers at the same time. And best of all, once it is setup you can even use it on your SQL 2000, SQL 2005 and SQL 2008 servers.

Solution
SQL 2008 introduced a new feature call "Central Management Servers (CMS)" which allows you to administer multiple servers and consolidate the SQL Server registration for all the SQL Server users such as developers, DBAs, etc.


Pre-requisite

  • You need at least one SQL 2008 Server to setup Central Management Servers
  • You also need to setup logins for Administration and General Users

Initial Setup

The setup is very straight forward. You just need to follow the How to: Create a Central Management Server and Server Group (SQL Server Management Studio) process which is outlined below.

  1. In SQL Server Management Studio, on the View menu, click Registered Servers.
  2. In Registered Servers, expand Database Engine, right-click Central Management Servers, point to New, and then click Central Management Servers.
  3. In the New Server Registration dialog box, register the instance of SQL Server that you want to become the Central Management Server. I used "DCKLEE\SQL2008" for this setup
  4. In Registered Servers, right-click the Central Management Server, point to New, and then click New Server Group. Type a group name and description, and then click OK.
  5. In Registered Servers, right-click the Central Management Server group, and then click New Server Registration.
  6. In the New Server Registration dialog box, register one or more instances of SQL Server that you want to become members of the server group.
  7. After you have registered a server, the Central Management Server will be able to execute queries against all servers in the group at the same time.

General Structure for Server Groups (How I do it) - Setting up Folders and register servers

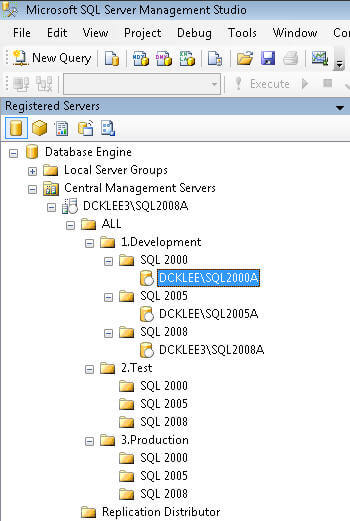
  • I typically start by creating a folder called "All" or "[Company Name] - All" and under that I create a folder for each SQL Server version as shown below. But you can set this up any way you want for your environment.

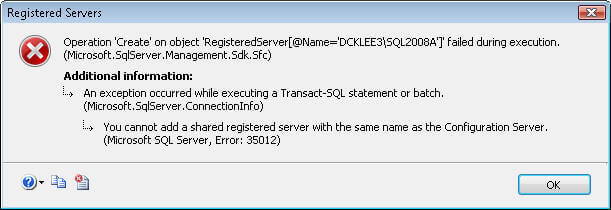
Now, here is one little tip. When you try to register the server that is running "Central Management Server" (for my case, DCKLEE3\SQL8008A), you will get the below error which says you cannot add a shared registered server with the same name as the Configuration Server.

When you get this error here is the work around. First, you need to find what port number the server is using. You can see "Static Port Assignments in SQL 2005" article to check what port is being using.

(If you are using Dynamic Ports, then you need to create an alias (see How to setup and use a SQL Server alias), but I wouldn't recommend using this because now you have to ask all the users to setup the same alias to use it. To make it easier you can deploy it automatically to all desktops by using a script, but again I wouldn't recommend using it unless you have to use dynamic ports.)

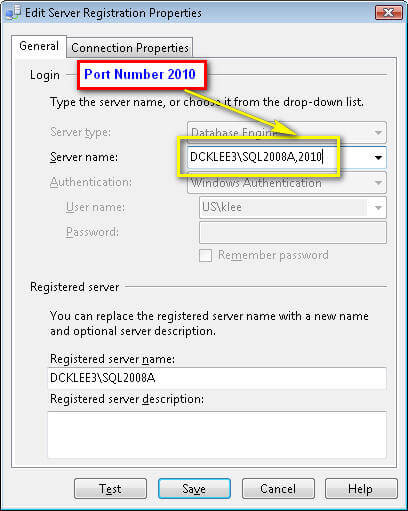
Anyway, once you find the port number, you need to put the port number along with the server name like "DCKLEE3\SQL2008A,2010" (i.e, 2010 is the port number for this server) and now you should be able to register it.


Example1: Pull Failed SQL Server Agent jobs for last 7 days for all SQL Servers

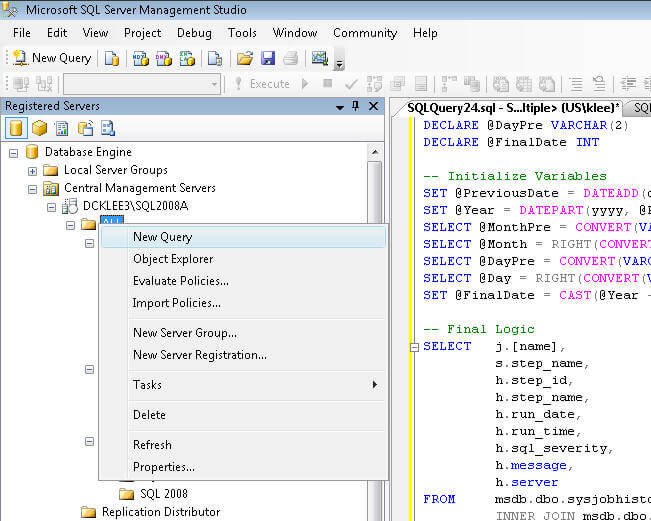
First, right click the "All" folder that you just created and choose "New Query":

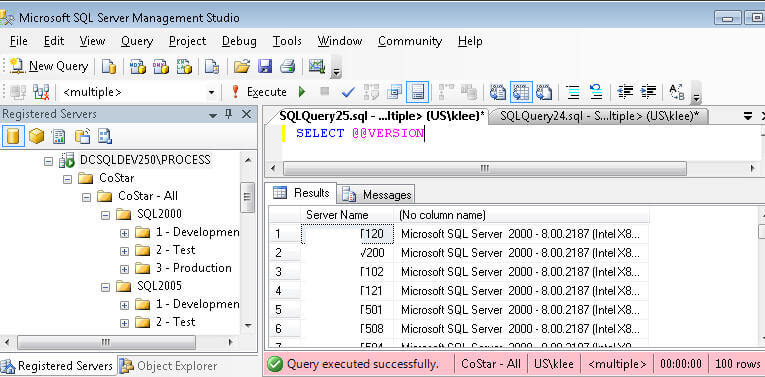
Second, run "SELECT @@VERSION" to see version information for all servers that have been registered. If you run the query you will see something like below which will give you this information for all servers in the "All" folder. (Note: for security purposes I hid the beginning part of the server names below, so the output looks a little weird.)


Example 2: Get the query from article "Failed SQL Server Agent Jobs" and try to run it! Pretty slick!

At this point you can execute any query you want and it will return results for each server in the group you selected.


Security Setup

In order to use this, you will need to setup two different permissions for two different users/groups. One will have management rights and the other read rights. There are new database roles in the msdb database, the two roles that will be used are:

  • ServerGroupAdministratorRole - management rights
  • ServerGroupReaderRole - read rights

  • For the general Reader, the login should use the 'ServerGroupReaderRole' role under msdb and here is the script that I used to create the login and give it permissions.
-- Setting up User for General Reader
USE [master]
GO
CREATE LOGIN [ILOVESQL\GroupDeveloper] FROM WINDOWS
WITH DEFAULT_DATABASE=[msdb]
GO
USE [msdb]
GO
CREATE USER [ILOVESQL\GroupDeveloper] FOR LOGIN [ILOVESQL\GrpDeveloper]
GO
EXEC sp_addrolemember N'ServerGroupReaderRole', N'ILOVESQL\GroupDeveloper'
GO
  • For the DBAs, the login should be on 'ServerGroupAdministratorRole' role under msdb and here is the script that I used to create the login and give it permissions.
-- Setting up User for Administrator
USE [master]
GO
CREATE LOGIN [ILOVESQL\GrpDBA] FROM WINDOWS WITH DEFAULT_DATABASE=[msdb]
GO
USE [msdb]
GO
CREATE USER [ILOVESQL\GrpDBA] FOR LOGIN [ILOVESQL\GrpDBA]
GO
EXEC sp_addrolemember N'ServerGroupAdministratorRole', N'ILOVESQL\GrpDBA'

That's all there is to it. Just setup a Central Management Server, register your servers, grant permissions and start executing queries across all of your SQL Servers.

Thank you: MS SQL TRIPS
Different ways to execute an SSIS package

Different ways to execute an SSIS package
Written By: Ashish Kumar Mehta -- 6/18/2009

Problem
One of the Junior SQL Server Developers in my company approached me yesterday with a dilemma. He was developing an SSIS Package which imports data from a comma separated text file and he wanted to know the different ways in which one can execute an SSIS Package in SQL Server 2005 and higher versions. At first I started to tell him, but figured it would be smarter to document the options and share the information.

Solution
In SQL Server 2005 and higher versions there are different ways in which one can execute an SSIS package. Let us go through each option one by one.


Execute SSIS Package Using SQL Server Business Intelligence Development Studio (BIDS)

During the development phase of the project developers can test the SSIS package execution by running the package from Business Intelligence Development Studio a.k.a. BIDS.

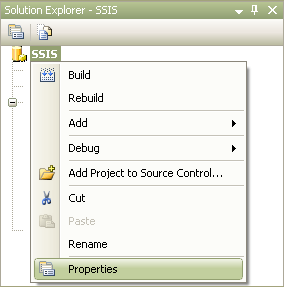
1. In Solution Explorer, right click the SSIS project folder that contains the package which you want to run and then click properties as shown in the snippet below.


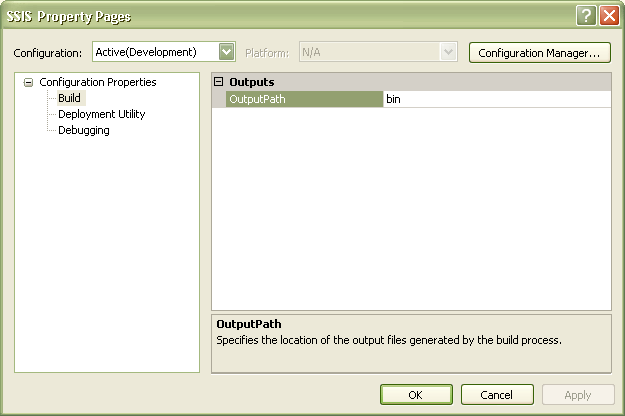
2. In the SSIS Property Pages dialog box, select Build option under the Configuration Properties node and in the right side panel, provide the folder location where you want the SSIS package to be deployed within the OutputPath. Click OK to save the changes in the property page.


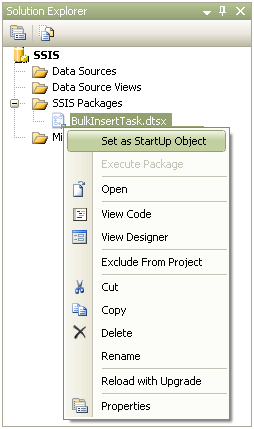
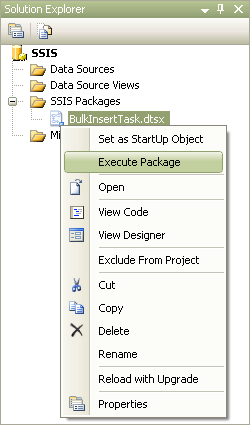
3. In Solution Explorer, right click the SSIS Package and then click Set as Startup Object option as shown in the snippet below.


4. Finally to execute the SSIS package, right click the package within Solution Explorer and select Execute Package option from the drop down menu as shown in the snippet below.


Execute SSIS Package using DTEXEC.EXE Command Line Utility

Using the DTEXEC.EXE command line utility one can execute an SSIS package that is stored in a File System, SQL Server or an SSIS Package Store. The syntax to execute a SSIS package which is stored in a File System is shown below.

DTEXEC.EXE /F "C:\BulkInsert\BulkInsertTask.dtsx"


Execute SSIS Package using DTEXECUI.EXE Utility

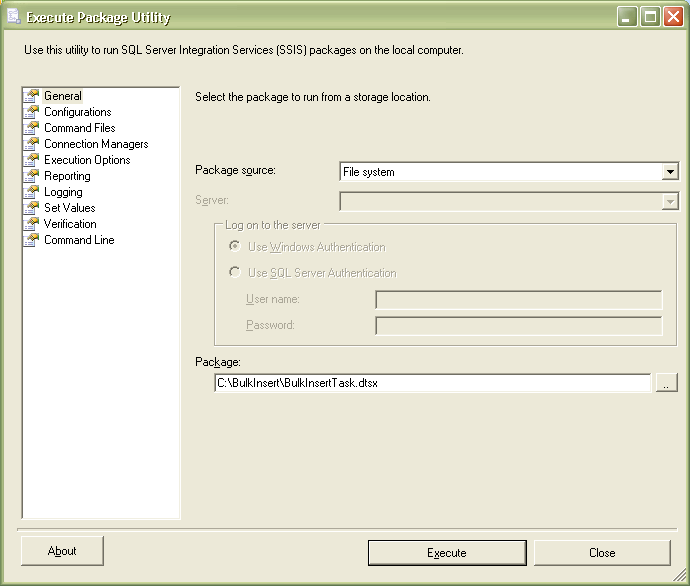
Using the Execute Package Utility (DTEXECUI.EXE) graphical interface one can execute an SSIS package that is stored in a File System, SQL Server or an SSIS Package Store.

1. In command line, type DTEXECUI.EXE which will open up Execute Package Utility as shown in the snippet below. Within the Execute Package Utility, click on the General tab and then choose the Package source as “File System”, next you need to provide the path of the SSIS package under Package option and finally click the Execute button to execute the SSIS package.


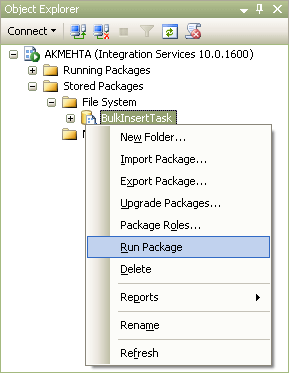
The Execute Package Utility is also used when you execute the SSIS package from the Integration Services node in SQL Server Management Studio.


Execute SSIS Package using SQL Server Agent Job

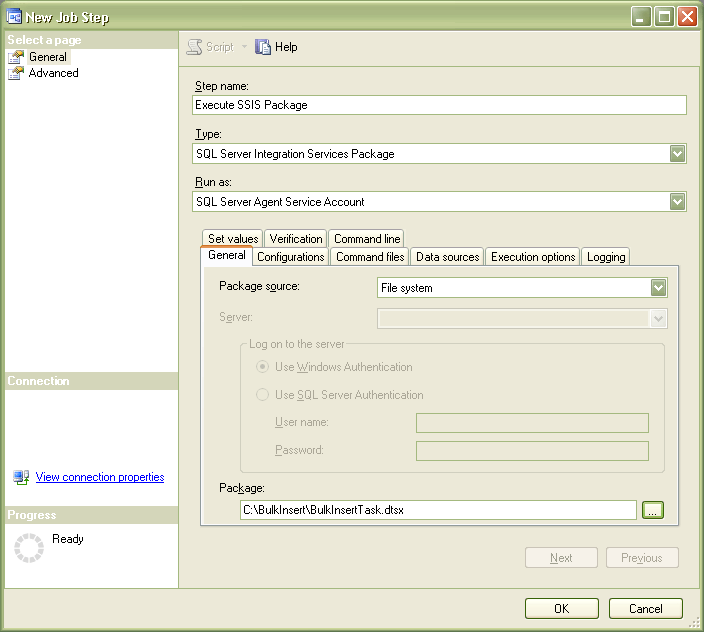
Using a SQL Server Agent Job one can execute an SSIS package that is stored in a File System, SQL Server or an SSIS Package Store. This can be done by creating a new SQL Server Agent Job and then by adding a new step with details as mentioned in the snippet below.

1. In New Job Step dialog box provide an appropriate Step name, then choose “SQL Server Integration Services Package” option as Type from the drop down list, and then choose “SQL Server Agent Service Account” as Run as value.

2. In the General tab choose the File System as Package Source and provide the location of the SSIS package under Package option.

3. Click OK to save the job step and click OK once again to save the SQL Server Agent Job

4. That’s it now you can execute the SQL Server Agent Job which will internally execute the SSIS package.


Note: You can also execute the SSIS package using the Export and Import Wizard once it is created using the wizard.

Thank you: MSSQLTRIPS

Automating Performance Monitor Statistics Collection for SQL Server and Windows
Written By: Ranga Narasimhan -- 6/19/2009

Problem
You have about 100 SQL Servers installed in your production environment. You have performance problems on few of the servers, but they happen during the time when you are not watching the servers. So, how can you automate performance statistics collection on all the servers around the clock so we have the statistics for 24/7/365.

Solution
You can use the built-in windows utility "logman" that comes free.

Logman is the command line utility for Perfmon. Thru logman, it is easy to automate perfmon data collection which I will show you below.

Data Collection

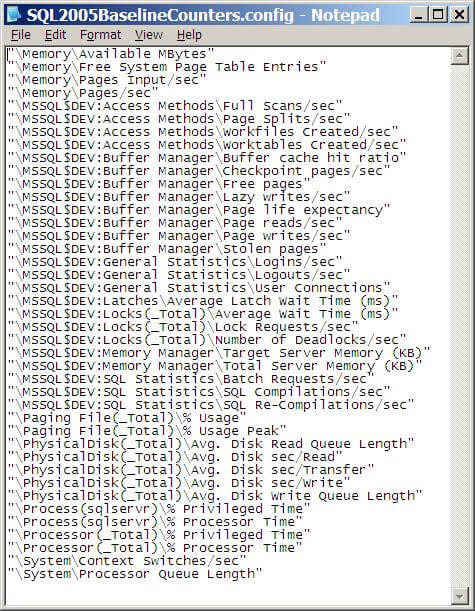
First, we need to identify what Objects and Counters we need. From my experience, the below counters are good from a SQL Server point of view. We can automate creating one perfmon log file for each day. Then move the old files to a network share for later reference.

Cut and paste the contents below to a file name "SQL2005BaselineCounters.config" and save the file in "E:\perflogs". You can choose any local drive/folder, make sure there is enough space in it. Try not to use the same storage that your SQL Server databases use, because this can slow down your I/O throughput.

Note in the below code I am collecting SQL Server data for an instance named "MSSQL$DEV". This will need to be replaced for your server. If you just have a default instance this will just be "SQLServer"


"\Memory\Available MBytes"
"\Memory\Free System Page Table Entries"
"\Memory\Pages Input/sec"
"\Memory\Pages/sec"
"\MSSQL$DEV:Access Methods\Full Scans/sec"
"\MSSQL$DEV:Access Methods\Page Splits/sec"
"\MSSQL$DEV:Access Methods\Workfiles Created/sec"
"\MSSQL$DEV:Access Methods\Worktables Created/sec"
"\MSSQL$DEV:Buffer Manager\Buffer cache hit ratio"
"\MSSQL$DEV:Buffer Manager\Checkpoint pages/sec"
"\MSSQL$DEV:Buffer Manager\Free pages"
"\MSSQL$DEV:Buffer Manager\Lazy writes/sec"
"\MSSQL$DEV:Buffer Manager\Page life expectancy"
"\MSSQL$DEV:Buffer Manager\Page reads/sec"
"\MSSQL$DEV:Buffer Manager\Page writes/sec"
"\MSSQL$DEV:Buffer Manager\Stolen pages"
"\MSSQL$DEV:General Statistics\Logins/sec"
"\MSSQL$DEV:General Statistics\Logouts/sec"
"\MSSQL$DEV:General Statistics\User Connections"
"\MSSQL$DEV:Latches\Average Latch Wait Time (ms)"
"\MSSQL$DEV:Locks(_Total)\Average Wait Time (ms)"
"\MSSQL$DEV:Locks(_Total)\Lock Requests/sec"
"\MSSQL$DEV:Locks(_Total)\Number of Deadlocks/sec"
"\MSSQL$DEV:Memory Manager\Target Server Memory (KB)"
"\MSSQL$DEV:Memory Manager\Total Server Memory (KB)"
"\MSSQL$DEV:SQL Statistics\Batch Requests/sec"
"\MSSQL$DEV:SQL Statistics\SQL Compilations/sec"
"\MSSQL$DEV:SQL Statistics\SQL Re-Compilations/sec"
"\Paging File(_Total)\% Usage"
"\Paging File(_Total)\% Usage Peak"
"\PhysicalDisk(_Total)\Avg. Disk Read Queue Length"
"\PhysicalDisk(_Total)\Avg. Disk sec/Read"
"\PhysicalDisk(_Total)\Avg. Disk sec/Transfer"
"\PhysicalDisk(_Total)\Avg. Disk sec/Write"
"\PhysicalDisk(_Total)\Avg. Disk Write Queue Length"
"\Process(sqlservr)\% Privileged Time"
"\Process(sqlservr)\% Processor Time"
"\Processor(_Total)\% Privileged Time"
"\Processor(_Total)\% Processor Time"
"\System\Context Switches/sec"
"\System\Processor Queue Length"

SQL Server Surface Area Configuration initial screen

Next step is to create a counter log in perfmon which will use the above counters. From a command prompt, execute the statement below on your SQL Server box.

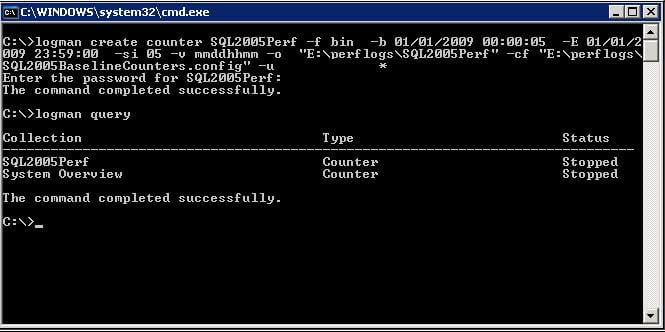
logman create counter SQL2005Perf -f bin -b 01/01/2009 00:00:05 -E 01/01/2009 23:59:00 -si 05 -v mmddhhmm -o "E:\perflogs\SQL2005Perf" -cf "E:\perflogs SQL2005BaselineCounters.config" -u domain\username *

You will be prompted for the password

Baseline Counters

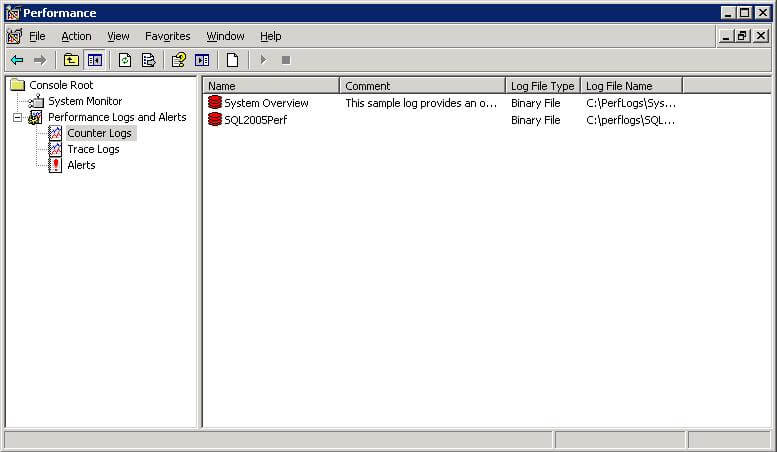
This will create a new counter log named "SQL2005Perf". To verify this, open perfmon and click "counter logs" under Performance logs and alerts.

Baseline Counters

Here is the notes for each option used above:

  • SQL2005Perf - name of the counter log
  • -f bin - binary format, with a .blg extension
  • -b 01/01/2009 00:00:05 - begin data and time, input a datetime to start the counter log at a later time, if you input a datetime that is past, the counter log will start immediately
  • -E 01/01/2009 23:59:00 - end date and time
  • -si 05 - 5 second interval
  • -v mmddhhmm - filename will be named as SQL2005Perf_mmddhhmm.blg
  • -o "E:\perflogs\SQL2005Perf" - output folder name
  • -cf "E:\perflogs\SQL2005BaselineCounters.config" - config file name with the counters
  • -u domain\username * - the * will prompt for the password for the domain user account.

You can manually start and stop the above counter logs with below commands:

Logman start SQL2005Perf

Logman stop SQL2005Perf

To get a list of all your counter logs you can run this command.

Logman query


Automate Data Collection

It would be nice if we have performance data for each day. This can be done by stopping the counter log at 11:59:59 PM and again starting it at 12:00:01 AM daily. Once you stop the counter log the log file is closed and starting the counter log creates a new log file.

Lets create a scheduled task which will do this.

Lets first create a batch file “StopCopyStart.bat” that will be executed by the scheduled task. Copy the contents below and save it in the folder “E:\perflogs”. Make sure to change the “Servername”, “SourceServerName” to match your servers.

ogman stop sql2005perf
sleep 1
move E:\perflogs\SQL2005Perf\*.blg \\Servername\E$\perflogs\SourceServerName
sleep 1
logman start sql2005perf

Baseline Counters

From the command prompt execute this statement to create the scheduled task.

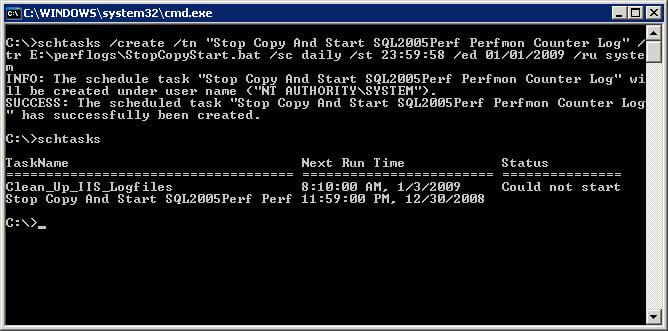
schtasks /create /tn "Stop Copy And Start SQL2005Perf Perfmon Counter Log" /tr E:\perflogs\StopCopyStart.bat /sc daily /st 23:59:58 /ed 01/01/2099 /ru system

Baseline Counters

Here are the notes for each option used above:
  • schtasks /create - create a new scheduled task
  • /tn "Stop Copy And Start SQL2005Perf Perfmon Counter Log" - scheduled task name
  • /tr E:\perflogs\StopCopyStart.bat - run this batch file
  • /sc daily /st 23:59:59 - schedule time
  • /ed 01/01/2099 - end date
  • /ru system - user account

A new scheduled task with name "Stop Copy And Start SQL2005Perf Perfmon Counter Log" will now be created. From the command prompt type "schtasks", this will list all the scheduled tasks.

Thank you: MSSQLTRIPS